|
Here are some tips from Julie's instructions How to Create a Fairy Garden Bowl by Julie Bishop 1. Gather supplies a. Container i. Best Size: 12” diameter, 6” deep. ii. Style: Terracotta, glazed ceramic, sturdy plastic, wood, metal, etc. b. Fill i. Use standard potting soil and fill up to approx. 2” from top of container. c. Landscape materials i. Moss, faux moss stones, colored sand and pebble chips, glass stones. ii. Faux foliage: succulents, flowers, ferns, mushrooms, etc. iii. Other natural materials: Pinecones, acorns, dried berries, etc. d. Figurines and accessories i. House/ Theme object: mushroom house, welcome door, castle, cottage, rainbow, etc. ii. Fairies, gnomes, unicorns, creatures, favorite theme character, etc. iii. Animal critters: frogs, birds, butterflies, bunnies, squirrels, owl, etc. iv. Misc. accessories: pumpkins, beehives, welcome signs, etc. 2. Layout supplies into the container as follows: a. Place the house or theme object at the top center as the main focal point. b. Place the faux flowers on the upper right and left sides next to the house. c. Gently push items into the potting soil until stabilized. d. Place a handful of moss around the house and the foliage. e. Create a pond on the lower left side using the glass stones and colored sand. f. Create a path to the house using the pebble chips. Line path with mushrooms. g. Place the gnomes and fairy figurines on the middle right or left side near the flowers and pond. Place the succulent bush on the upper left middle section. h. Place another handful of moss around the figurines. i. Place the animal critters, butterfly and other accessories accordingly. 3. Adjust items as necessary a. Move any items and rearrange landscaping material as necessary. 4. Insert a chalkboard pick sign - optional a. Theme of custom fairy garden or message may be written on the chalkboard. Here are some theme ideas: Birthday Gifts for all ages and for Special Occasions such as Weddings, Baby Showers, Personal Achievement Celebrations, Holiday Seasonal Décor and More! Seasons and Holidays: Valentine’s Day, St. Patrick’s Day, Spring, Easter, Summer, Fall Harvest, Day of the Dead, Thanksgiving, Christmas, Winter. “My Favorite Things” for Mother’s Day, Father’s Day, Grandparents Day. Natural Environments: Forest, Meadow, Beach, Desert, Farm, Island, etc. Unique Gardens Options: Florals, Succulents, Cacti, Rocks or Sand and Shells. Travel Locations or Vacation Memories: Paris, Hawaii, NYC, Japan, Africa, etc. Fantasy: Fairies / Wizards / Unicorns / Gnomes / Trolls / Mermaids / Pirates Space / Star Wars / Aliens / Superheroes Dragons / Dinosaurs / Pets / Zoos Castles and Royalty / Disney Princesses Cars / Trucks / Machines / Robots Movies / Books / Music / Sports / Hobbies Spiritual / Zen Enlightenment / Day of the Dead Death Memorials
0 Comments
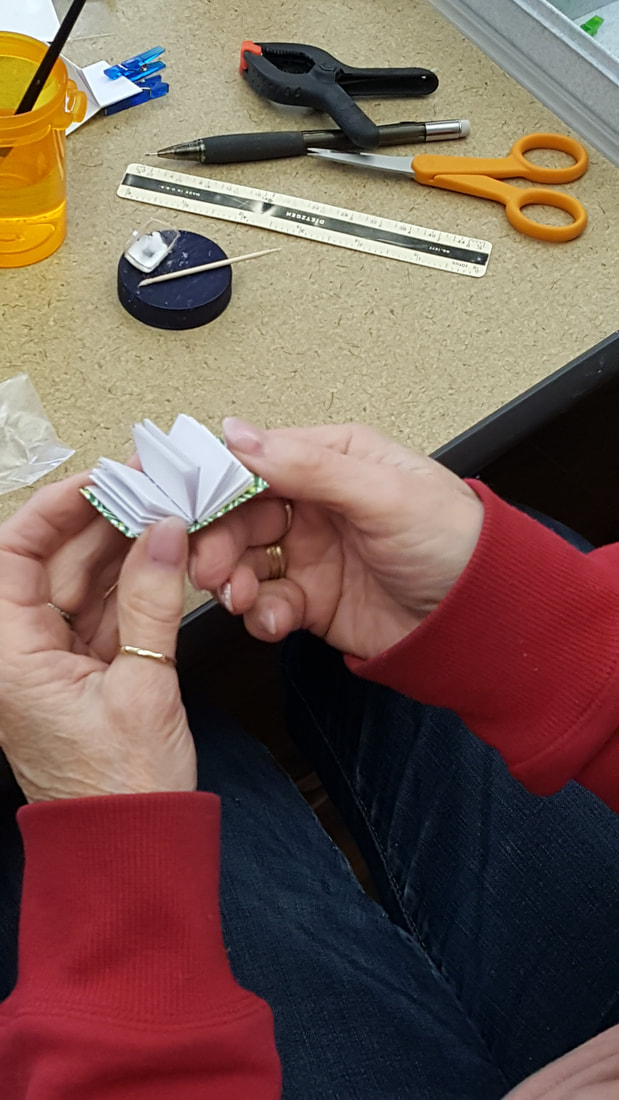
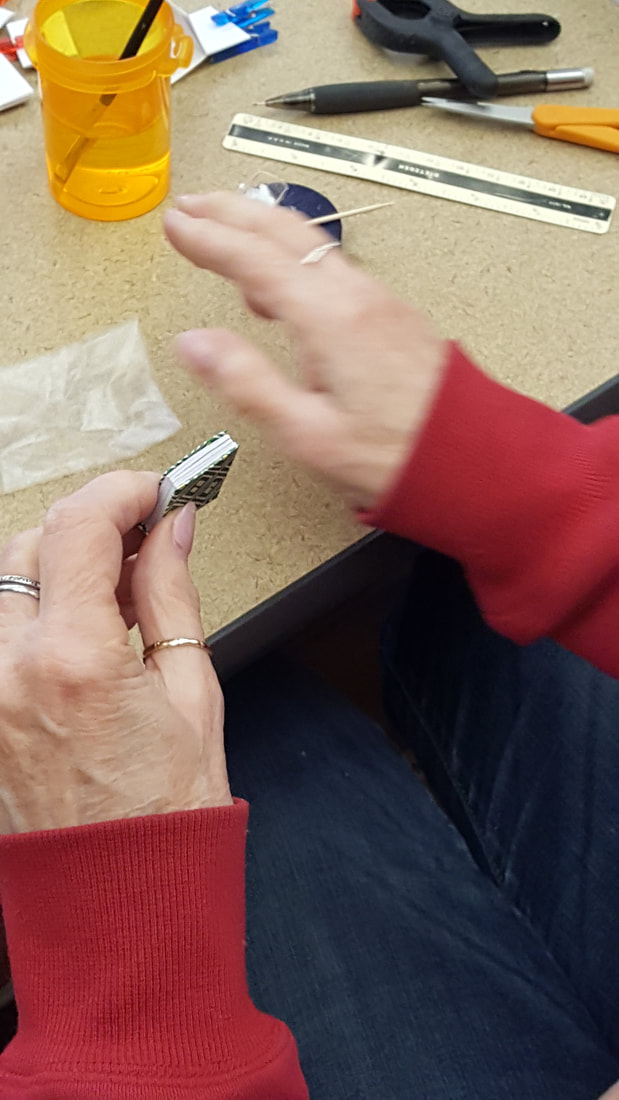
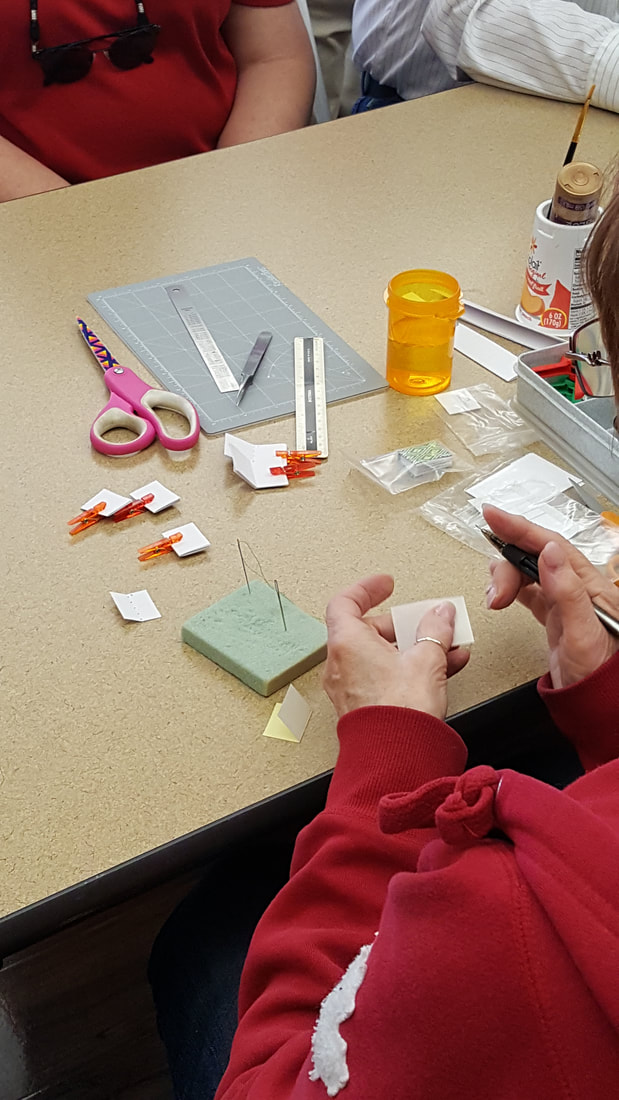
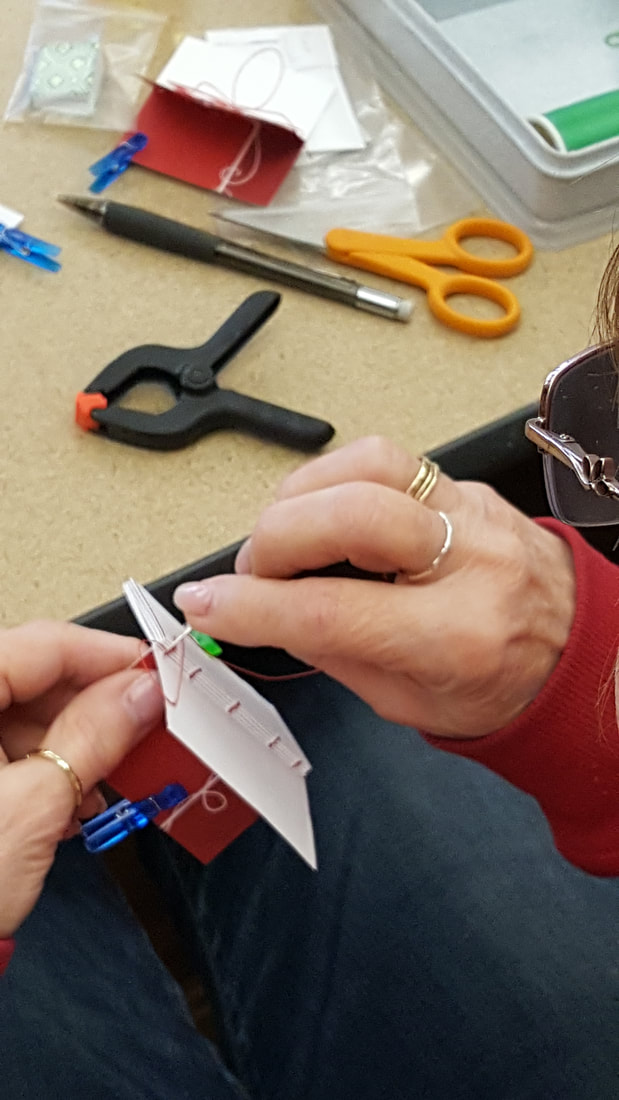
Sandra Erasmus gave us a demonstration on bookbinding in miniature. She creates these mini books in the same manner as large size books are done, and although it seemed complicated she says that once you start doing it you get the hang of it fairly quickly. Download the book instructions below if you want to try making your own!
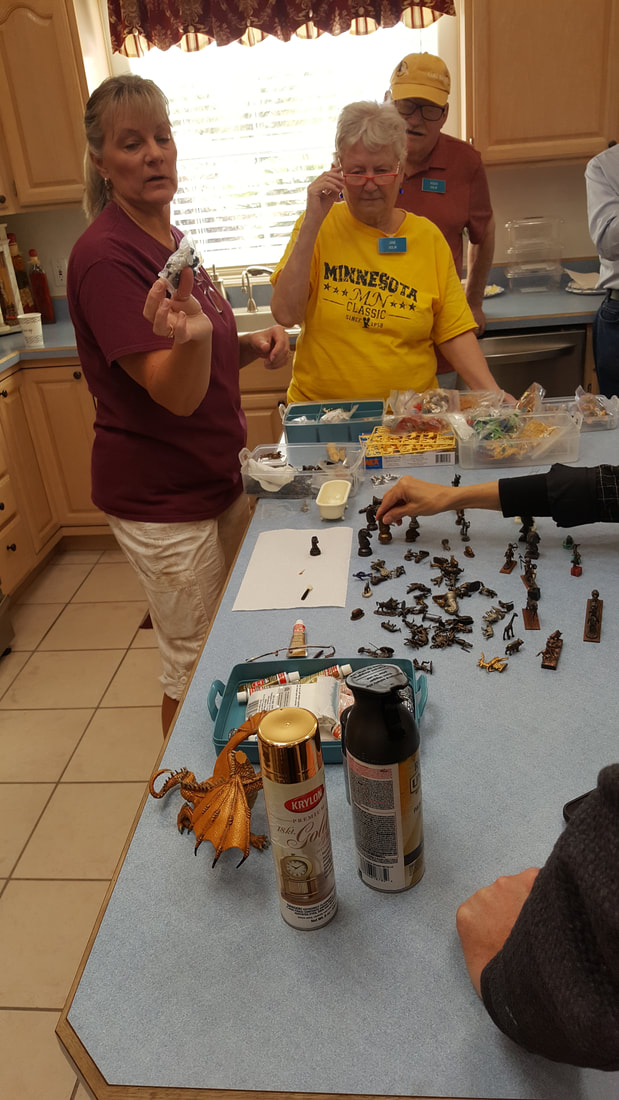
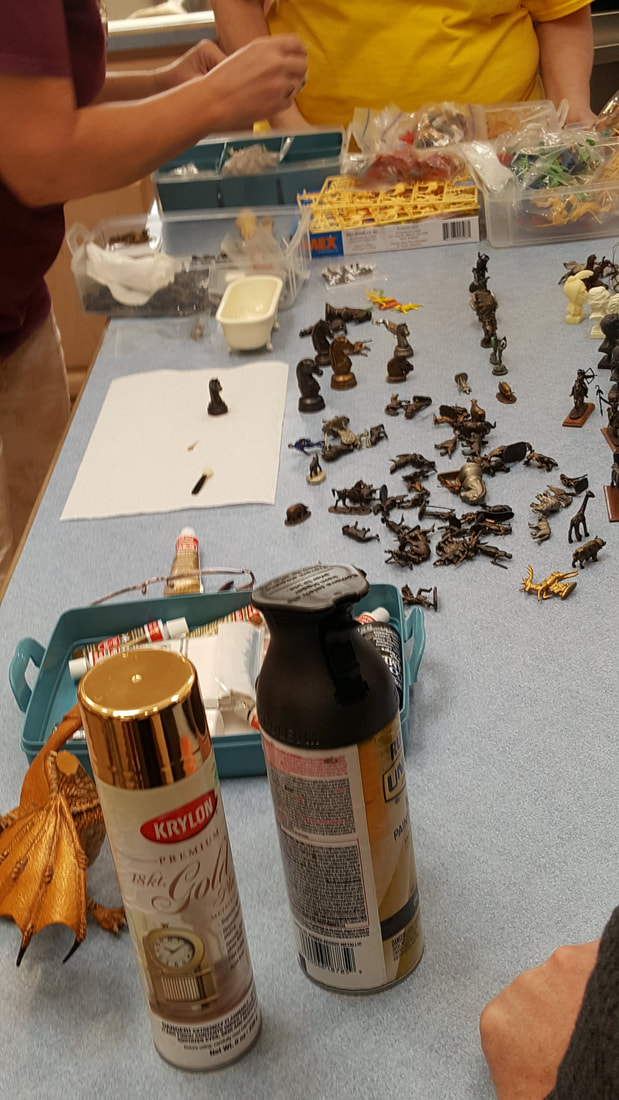
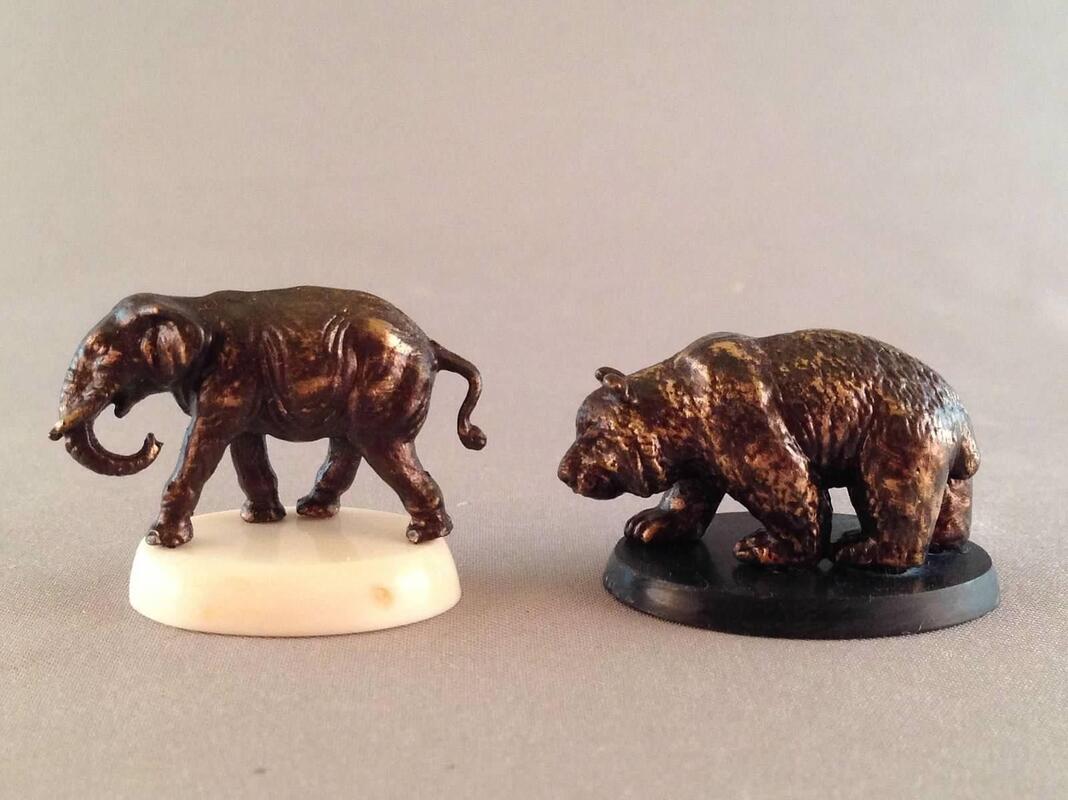
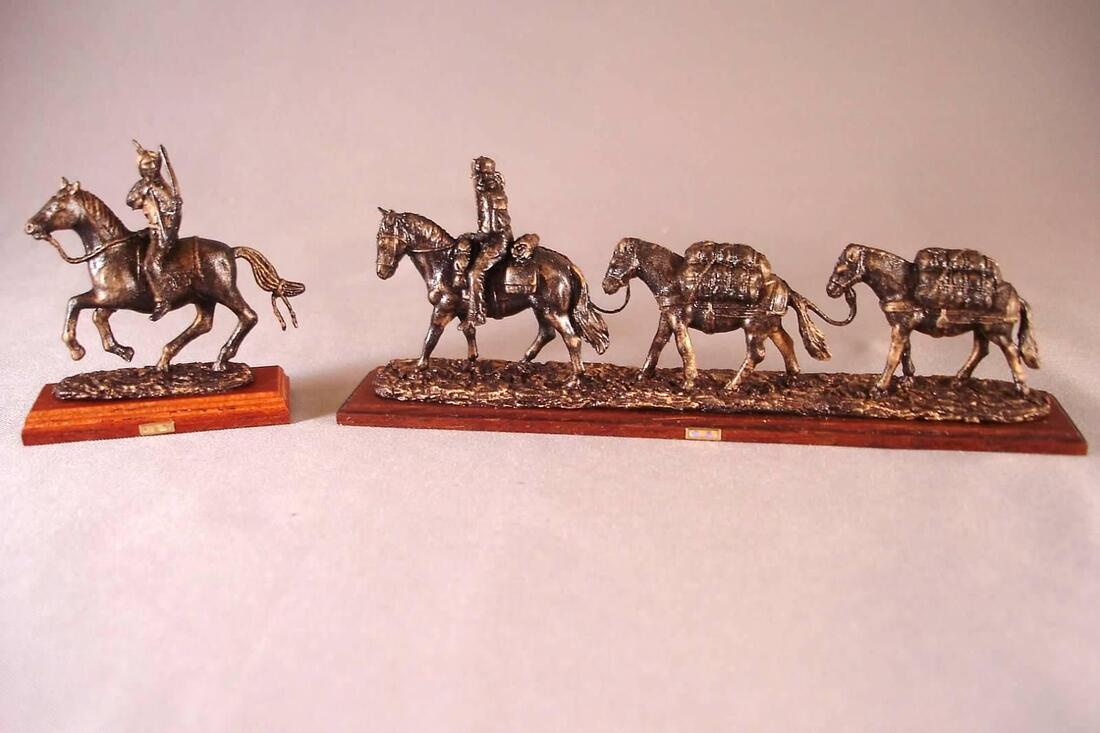
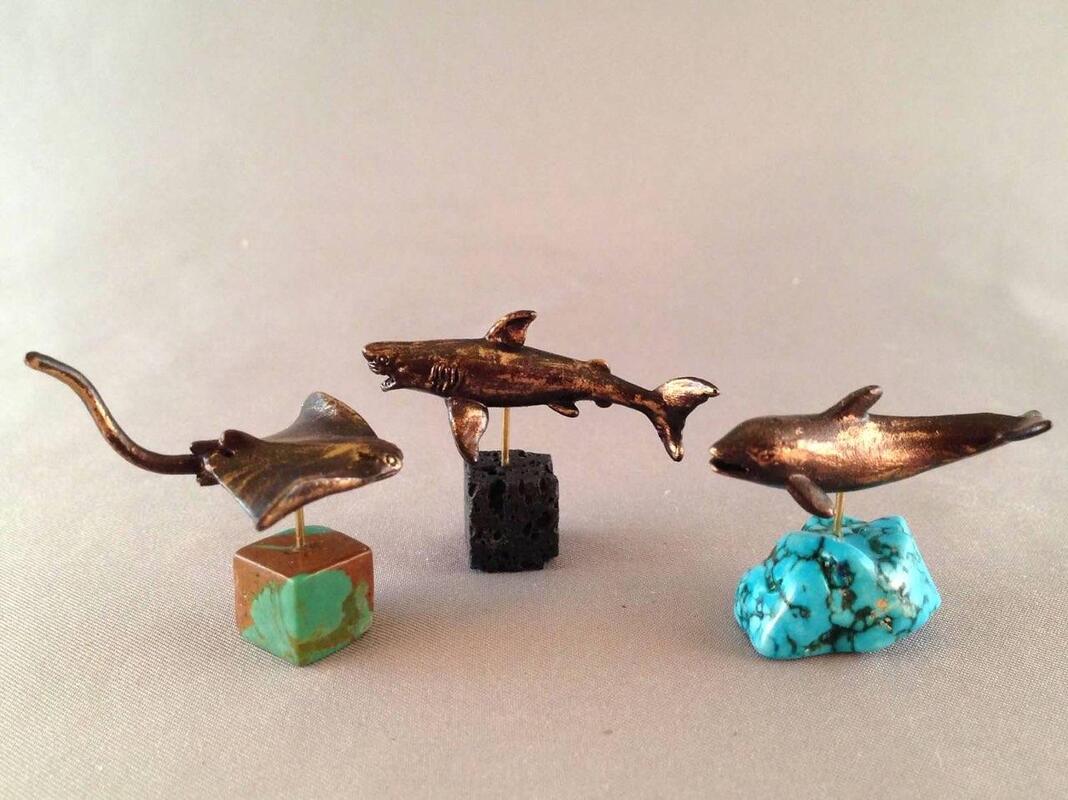
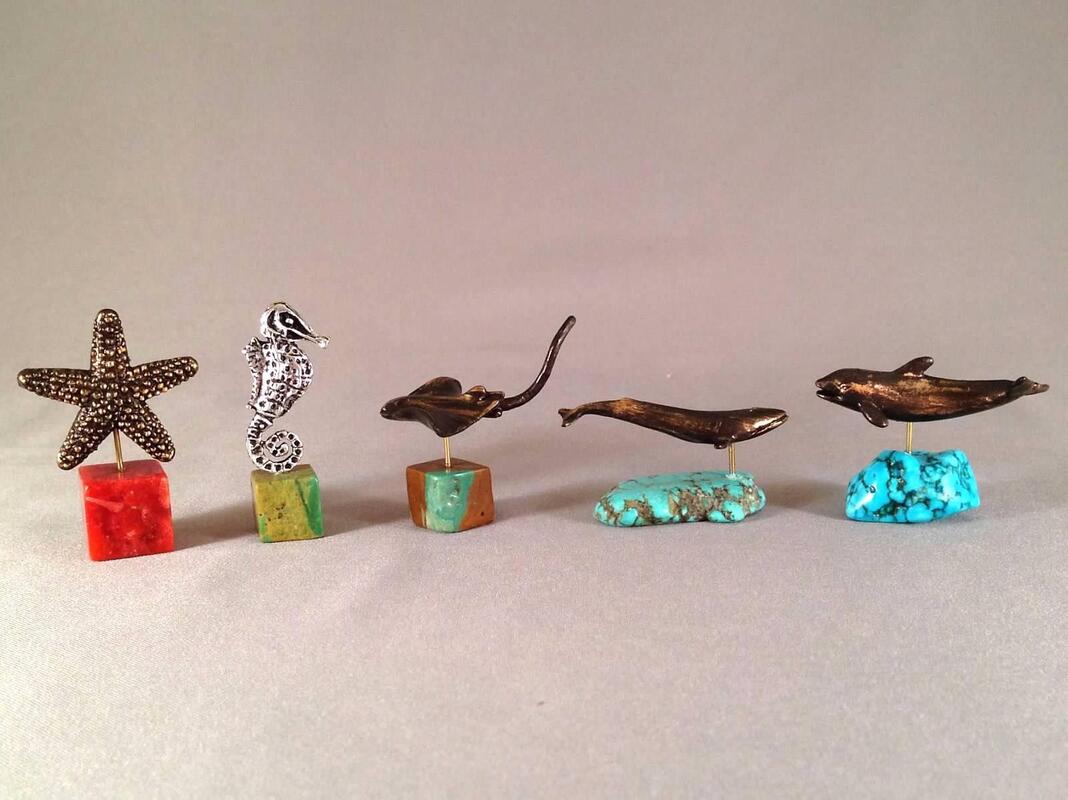
At our first meeting of the year Connie showed us how to turn children's plastic toys and animal figures into sculptures and accessories - Once she has selected or modified the toys she wants to use, she sprays them with primer and paints. Her recommendations: Spray with Blackened Bronze spray paint. Use Antique Gold Rub n' Buff to highlight details. Can also spray the base color with gold, pewter, silver or copper. Glue statues on a base for added detail. Member Connie Sauve gave us a wonderful seminar on aging techniques at our August meeting. Click on the link for a copy of her tips and tricks. weathering_aging_rust_and_bird_poop_.pdf
The prototype was constructed of 1" thick and 1/4" thick builder's foam (photos coming soon). Patterns were scaled down to half size so they could fit on 8 1/2" x 11" sheets of paper, and the pieces are laid out on a half-inch grid with dimensions given on each piece so you can use those to scale them up to full size. A quarter scale pattern is also included in a separate file. This could be printed out on card stock and the pieces cut out for templates. If you have any problems with the files please email [email protected] Have fun!
Looking forward to seeing what wonderful things the club members will come up with!
Here are some fun bumper stickers in 1:12th scale to add you your travel trailer project. You could print them out on a sheet of sticker paper, or print them on regular paper and glue them on as desired. The image is just a preview, you can download or print the pdf file by clicking on the link. 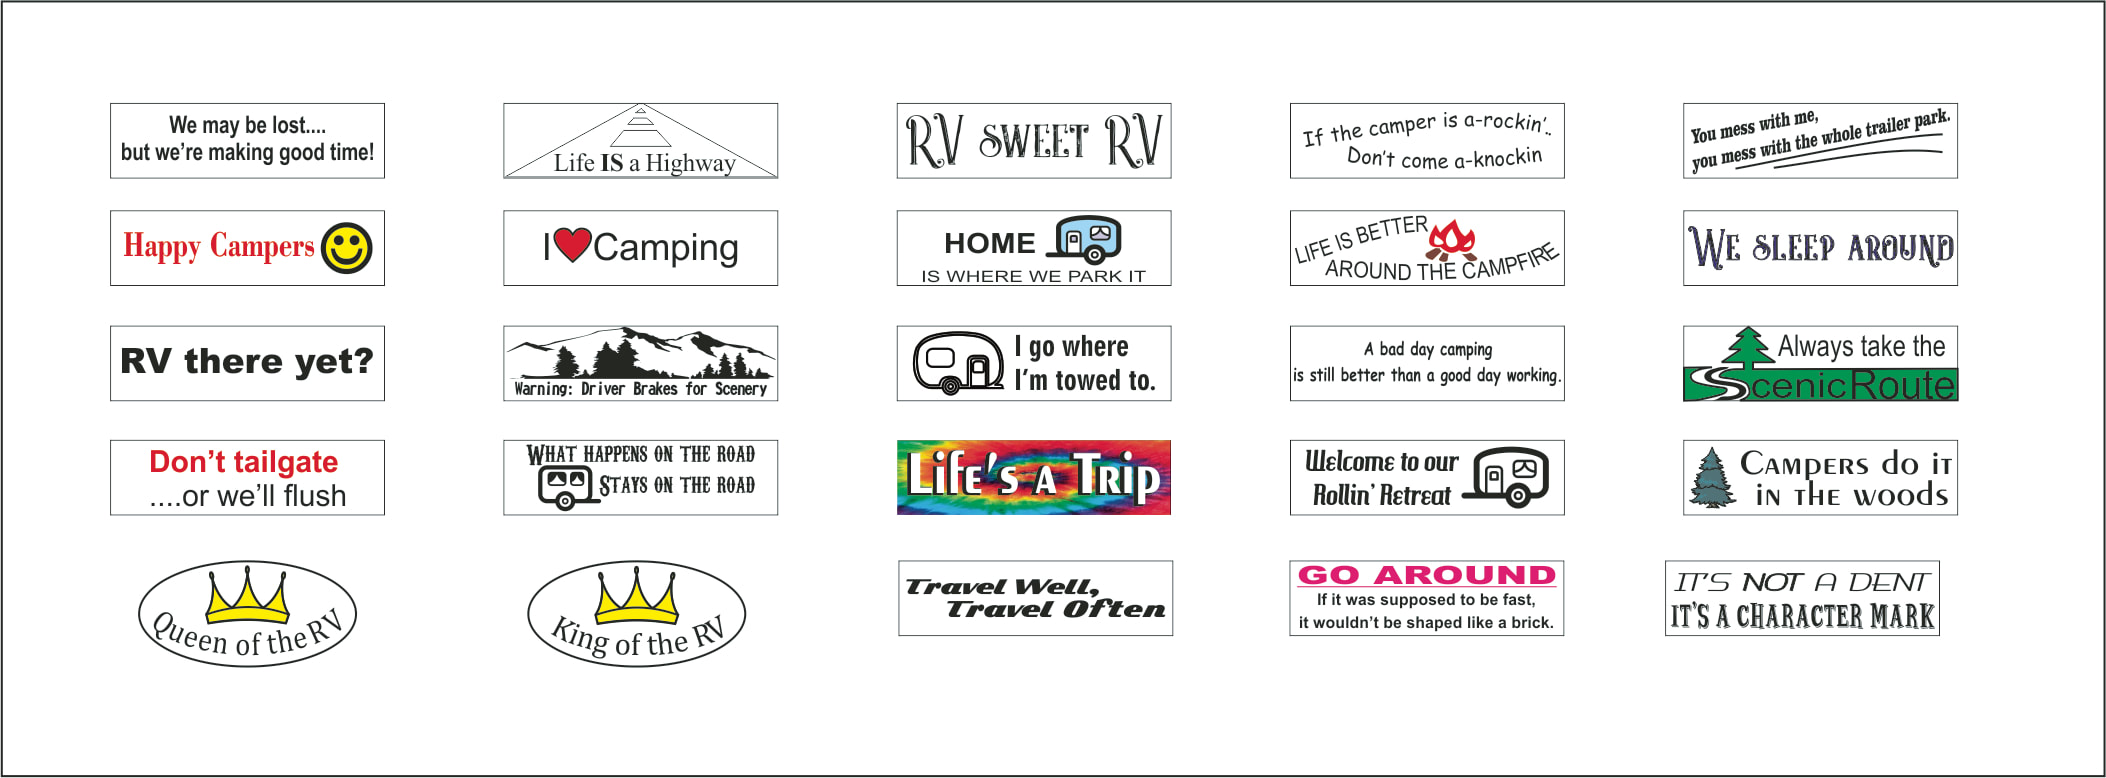
Cindy writes:
"Today, I was working on my trailer, painting it. I was using red and it was a brand new brush. I couldn’t get the paint off the dang brush. So I thought and thought. I went to the laundry room and grabbed less than a ¼ teaspoon of oxy clean (powder type) and mixed it in the brush, a few seconds later my white brush that was red was bright white. No need to throw away ruined paint brushes anymore. (the paint was metallic with glitter flakes also.)" Thanks, Cindy, I'm sure we've all had trouble getting brushes clean now and then! Member Sue Blakesly shared her formula for Landscape Glue
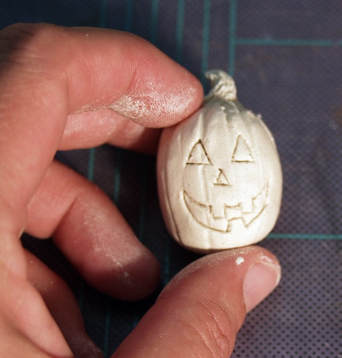
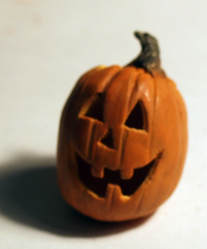
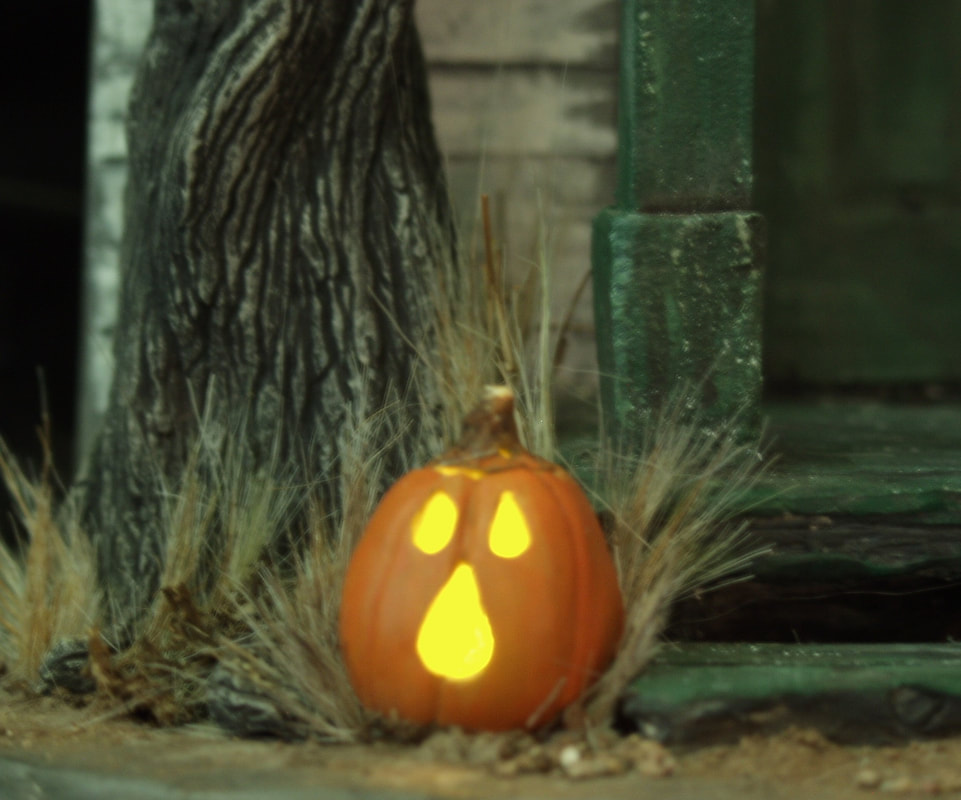
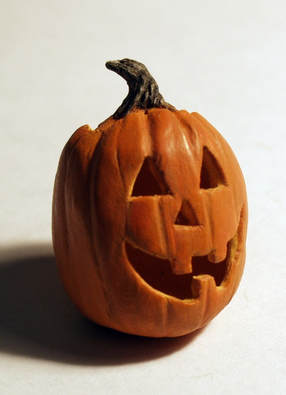
1/3 alcohol 1/3 water 1/3 white glue 4 drops dish soap Sue says this dries clear and holds tight, can be sprayed, brushed, or dabbed on 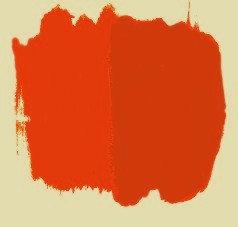 Here is how I paint my miniature jack-o-lanterns Colors on my palette: (Delta Ceramcoat Acrylic Paints) Bright Red Opaque Yellow Golden Brown White Phthalo Blue Burnt Umber Dark Forest Green In general if you want a more natural look to your paints for things like apples, leaves, (pumpkins) you will get better results if you add a small amount of the base color's complimentary color into the mixture. This is why I have phthalo blue on my palette for the pumpkins. Start by mixing a base color for the pumpkin with 1 part red to 2 parts yellow (9 drops red and 18 drops yellow is a good amount to start with) then add a TINY amount of phthalo blue. (mix red and yellow and just barely dip one edge of paintbrush into the phthalo blue, then mix into orange). Phthalo blue is a very strong color, so a small amount will do. If you get too much blue in the mixture you will end up with brown instead of pumpkin orange - just add some more yellow and red to the paint mixture to fix this problem. This is a photo of the difference between pure orange (on the left), and orange with blue mixed in (on the right). I had a hard time trying to get the colors to show up accurately on the digital photo, but trust me, the color on the right is a much more natural pumpkin color. You'll just have to try it to see how much better the color looks with the addition of it's complimentary color. Now you have this puddle of basic pumpkin color - we are going to work from this for the other colors, starting with the color for the inside of the pumpkin. Pull some paint away from the puddle and add in 4 or 5 drops of yellow, 1 drop golden brown, and 4 or 5 drops white. In this instance, it's better to get the mixture too light than too dark, since for a miniature jack-o-lantern there is not going to be much actual light coming in from the front (if you are going to be lighting your jack, you might want to add a bit more yellow and golden brown if using a white light, or a bit more white if using an amber light). 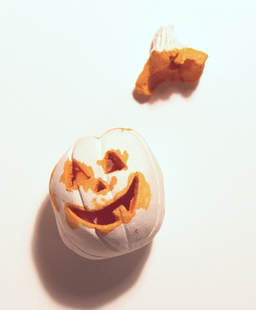 Paint the inside of the pumpkin, making sure to paint the edges of cut-out areas (and don't forget the top!) 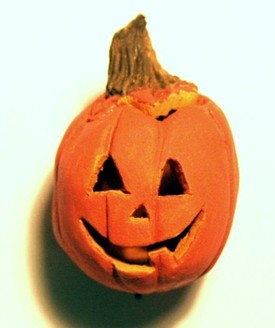 Next make another small puddle with about 1 part burnt umber and a small amount of dark forest green, then pull some of your base pumpkin color into the mixture. Make a wash of this color and apply to stem. Then paint the outside with your base pumpkin color. Brush a light wash of burnt umber over the entire jack-o-lantern, stem and all. This will deepen the colors, enhance the sculpting, and help blend the edges between the inside and outside colors. 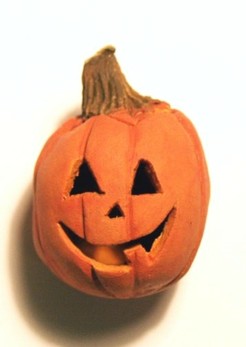 Next we are going to highlight the raised sections. Into your puddle of base color, mix a little white and yellow. Make a wash of this color and dry brush ACROSS the pumpkin, just hitting the raised areas. (it may seem like an oxymoron to "dry brush" a wash, but here is how to do it - create the wash, load your brush, then wipe most of it off on a paper towel before applying to pumpkin. If you can see brush strokes, you can blend them in with your fingertip.) When that layer of paint is dry, go over jack once more with a very light wash of the base color. Dry brush stem across the grain with a mixture of burnt umber and white. When those layers are dry, add a final light wash of burnt umber over the entire jack-o-lantern. 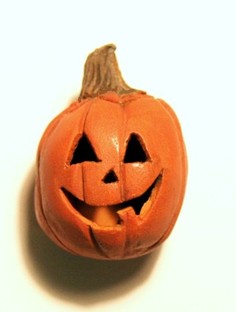 The final step is to let the paint dry, then buff with a piece of brown paper bag until the jack-o-lantern has a soft sheen.
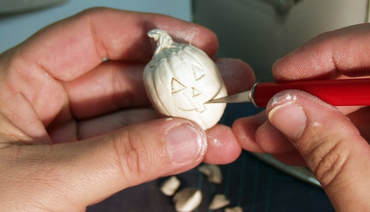
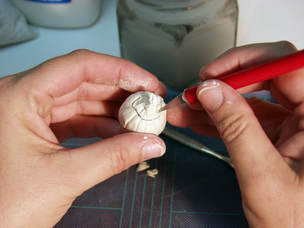
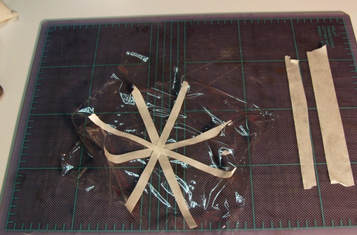 For this project you will need: Creative Paperclay 1 piece of plastic wrap, approx. 6" X 6" craft knife masking tape thread scissors sand (or baking soda) sculpting tools water for smoothing paperclay paints * optional but not necessary: tweezers, needle files, 600 grit sandpaper - Cut masking tape in to strips approx. 5" long by 1/8" to 1/4" wide - Apply strips of tape to plastic wrap, in diagonal criss-cross pattern as shown. 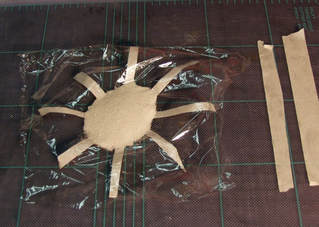 - turn plastic wrap over so side with tape is facing down. - pour about a tablespoon of sand in center, more or less depending on the size of jack-o-lantern you are making. Remember though, that this is going to be the INSIDE dimension, so don't use too much sand. 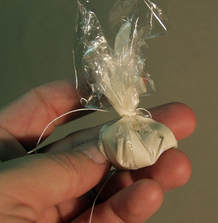 - Pull plastic wrap up around sand and tie top securely with thread. At this point you will have a little floppy baggy of sand. Trim excess plastic wrap from top. In the next step, you want to firm up the bag and form the shape of jack-o-lantern you want. Do this by wrapping additional strips of masking tape around the bag. 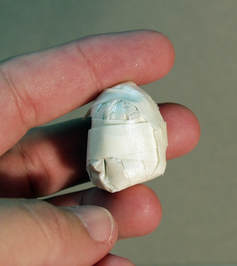 If you want a short, fat jack-o-lantern, wrap from top to bottom of bag first. If you want a taller jack-o-lantern, start wrapping sand bag in center, and shape with additional strips of masking tape around the bag as shown. You should end up with a firm packet of sand in the approximate shape you'd like your pumpkin to be. 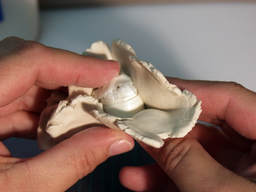 - Roll or press out a circle of paperclay big enough to cover bag, and about 1/16" thick. Place bag in center of circle and begin pulling clay up over bag, pinching off excess as you go. 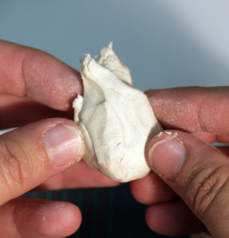 Cover bag and smooth clay by dipping your fingers in water and rubbing over clay. 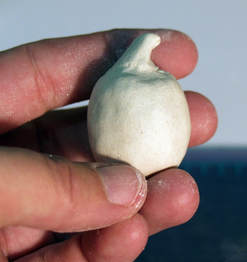 Here is the bag covered with clay and smoothed out. Don't forget to leave a little stem! 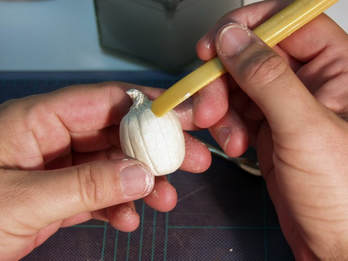 Sculpt sections and stem into clay.
 When you are finished sculpting the pumpkin, cut top and face design into pumpkin. Use an up-and-down motion with the knife, and cut to, but not through the masking tape. Do not remove the sections you are cutting, leave them in place. Now comes the most difficult part - Set the jack-o-lantern aside to dry. Wait. Patiently. It will take about a day to dry, depending on your climate. You can console yourself while waiting by making more jack-o-lanterns! - When clay is dry, cut around top again. Use an up-and-down sawing motion with the knife, this time cutting all the way through the masking tape and into the sand. - Carefully remove top and pour sand out of bag. - Remove plastic wrap from inside of jack-o-lantern (tweezers are useful for this). - Re-cut lines in jack-o-lantern face design if necessary and remove pieces. - File edges of cuts if desired, and, if desired, lightly sand jack-o-lantern with 600 grit sandpaper.
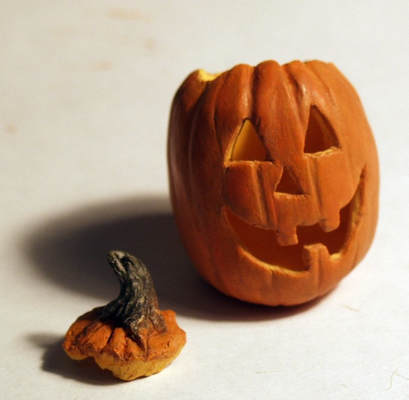
Paint with acrylic paints and polish with tissue paper or a paper bag.
|
TMS Club Members share their tips, pointers and projects.Archives
March 2023
Categories |
|||||||||||||||


 RSS Feed
